Alternate title: Hosting an email forwarding server, the wrong way.
Disclaimer: I am an email noob! I blundered around for a few days and found a solution that seems to work for me, for now. If I’ve done something terribly dumb, I’d love to hear about it in the comments or via a direct message so that I can make an improvement and correct this documentation in case it ends up as someone else’s guide during their own email forwarder setup adventure.
As the purveyor of a number of fine websites, including johnmcnelly.com, pantsforbirds.com, daweeklycomic.com, and others, there have been a number of occasions where a custom email address attached to one of my website domains would be helpful. A number of years ago, I used email hosting provided by my domain registrar, but that service was discontinued and the replacement was too expensive to justify given my desire for multiple custom email domains and relatively low email volume. Recently, while trying to sign up for free samples of some electronic components, I was confronted with the need for an email address that did not end in “@gmail.com” (I suppose to dissuade yahoos without a “real company” from collecting samples). As a yahoo without a real company who wanted to collect some samples, I was excited to set up my own mail forwarding server and get some free parts. How hard could it be?
What’s an MTA? Something something New York subway?
MTA stands for Mail Transfer Agent! An MTA is responsible for receiving an email message and routing it to where it needs to go. In the case of my websites, I don’t want a full separate email inbox for each website, since I couldn’t be bothered to check all of them and I’d rather have my emails in one place. As long as I can receive emails sent to a handful of custom addresses into one inbox, and also reply to those emails from said inbox while still using the original custom email domains, I can avoid breaking the illusion of having multiple fully-fledged custom email accounts while not having to deal with the overhead of extra inboxes. This is the perfect job for a customizable Mail Transfer Agent, like postfix. There are even pre-built docker images for the postfix MTA, like this very popular docker image by @zixia called Simple Mail Forwarder.
In theory, if I add the SMF docker image to my existing docker compose file on my webserver, twiddle some domain settings to get MX records for each domain pointed at said webserver, and add a config file to my docker compose setup with some settings required to set up the SMF image, I should be off to the races! Email servers looking to send mail to a custom account like john@pantsforbirds.com will first ask the Domain Name Service (DNS) provider for pantsforbirds.com what the address of the mail server is by looking up the associated MX record, which will resolve to the IP address of my webserver. Then, the outgoing email will be sent to my webserver, ingested by postfix within the SMF docker container, and spat back out as a forwarded email heading towards my real email inbox at some gmail account or the other. When I’d like to reply to the email, I would send an email from my gmail account to SMF on my webserver via an authorized link using the Secure Mail Transfer Protocol (SMTP). The outgoing email would then be emitted from my mailserver onto the internet, heading towards whatever server was in charge of receiving messages for its original sender. To everyone on the outside, it would look like the original email targeting john@pantsforbirds.com had been ingested by a mailserver at pantsforbirds.com, and some time later, a reply message was sent from the pantsforbirds.com mailserver. Mission accomplished!
Simple Mail Forwarder (SMF) Setup
The core setup of SMF has a good number of steps to it. Here’s what I did!
- Add SMF to your docker compose file. Make sure to expose port 25 and 587 to your network, or set `network: host` mode in order to allow it to open up arbitrary ports.
- If your machine is behind a Network Address Translation (NAT) layer, make sure to port forward with your router so that <your public IP>:25 and <your public IP>: 587 direct to your SMF docker container. Note that exposing port 25 may be difficult if you are on a residential internet connection (see the next section).
- Link a .env file into your mail-forwarder service in order to configure your SMF setup.
- Add an MX record to your domain, pointing to your server’s domain name (e.g. mail.pantsforbirds.com). NOTE: If you are on a residential internet connection, you may need your MX record to point to an email store and forward service instead (see next section).
- Copy over your TLS certificates from Let’s Encrypt or another certificate provider into SMF_CERT_DIR. The certificate file fullchain.pem should be renamed to smtp.ec.cert (or smtp.cert for a non-ECDSA version), and the key file privkey.pem should be renamed to smtp.ec.key (or smtp.key for the non-ECDSA version). Note that SMF wants both an RSA certificate / key pair and an ECDSA certificate / key pair, but defaults to using the ECDSA key pair. If you fail to provided either key pair, it will be auto-generated with a self-signed certificate during SMF docker startup, but this can cause your email to be rejected as insecure by many mail servers! To be safe, I copy over the ECDSA certificates and put them into SMF_CERT_DIR as both smtp.ec.<cert/key> and smtp.<cert/key>.
- Launch SMF (`docker compose up` etc), and add the generated DKIM keys to your domain records. These are used to prove that an email supposedly sent from your domain is authentic!
SMF Docker Compose File
Here’s my docker compose file, showing an example of how a website is hosted alongside SMF in a single docker compose file. The certbot container has a custom entrypoint script that is used to copy over TLS certificates issued to the website into the SMF_CERT_DIR directory so that SMF can use them for SMTP.
compose.yml
version: '3.3'
name: birdbox-docker # This is appended as a prefix to all container names.

services:
  # NGINX Container for routing. Applies a custom configuration on top of the default nginx container.
  nginx:
    image: nginx
    restart: always
    ports:
      - 8081:80
      - 80:80 # HTTP
      - 443:443 # HTTPS
    volumes:
      # Bind mount the local nginx directory into the container to move over the configurations.
      - ./nginx:/etc/nginx/conf.d
      # - ./nginx/templates:/etc/nginx/templates
      # Bind mount folders from the local certbot directory into the container.
      - ./certbot/data/conf:/etc/letsencrypt
      - ./certbot/data/www:/var/www/certbot

  # Certbot for SSL certificates.
  certbot:
    image: certbot/certbot
    volumes:
      - ./certbot/data/conf:/etc/letsencrypt
      - ./certbot/data/www:/var/www/certbot
      - ./certbot/scripts:/etc/scripts
      - ./mail_forwarder/data/certs:/etc/postfix/cert
    entrypoint: "/bin/sh /etc/scripts/entrypoint.sh" # renews certs and copies certs to mail-forwarder
    env_file:
      - ./mail_forwarder/.env.smf

  mail-forwarder:
    image: zixia/simple-mail-forwarder:1.4
    restart: always
    depends_on:
      - certbot # Certbot provides the SMTP certificates used by mail_forwarder.
proxying.
    ports:
      - 25:25 # Incoming mail.
      - 587:587 # Outgoing mail (SMTP with TLS).
    env_file:
      - ./mail_forwarder/.env.smf
    volumes:
      - ./mail_forwarder/data/postfix:/var/log/postfix
      - ./mail_forwarder/data/certs:/etc/postfix/cert
      - ./mail_forwarder/data/dkim:/var/db/dkim
      - ./mail_forwarder/data/mail:/var/mail
      - ./mail_forwarder/scripts:/etc/scripts

  johnmcnelly-wordpress-site:
    image: wordpress
    restart: always
    ports:
      - 8082:80
    env_file:
      - ./wordpress/.env.johnmcnelly
    # hostname: johnmcnelly-wordpress-site
    depends_on:
      - johnmcnelly-wordpress-db
    volumes:
      - johnmcnelly-wordpress-site:/var/www/html

  johnmcnelly-wordpress-db:
    image: mysql:8.0
    restart: always
    ports:
      - 5002:3306 # for localhost debugging access
    env_file:
      - ./wordpress/.env.johnmcnelly
    volumes:
      - johnmcnelly-wordpress-db:/var/lib/mysql

volumes:
  johnmcnelly-wordpress-site:
  johnmcnelly-wordpress-db:
entrypoint.sh
Here’s the custom entrypoint script for certbot from my Docker compose file.
# !/bin/sh

# This script runs when the certbot container is started. Its mission is to periodically check for
# certificate renewals using the certbot utility, and copy the mailserver's certificates over into
# the Simple Mail Forwarder's certificates directory for use in SMTP TLS authentication.
#
# The certificate copying portion of this script lives here instead of in the mail-forwarder container
# so that SMF sees valid pre-existing certificates as soon as it starts up, and won't generate its
# own. This is enforced with a depends_on clause in docker-compose.yml.

trap exit TERM # Exit this script when the container is being terminated.
while :
do
    certbot renew
    # Copy the ECDSA certificates used for the mail server from certbot to Simple Mail Forwarder's cert dir.
    echo -n "Copying and renaming certificate/key files from /etc/letsencrypt/live/$SMF_DOMAIN to $SMF_CERT_DIR..."
    cp /etc/letsencrypt/live/$SMF_DOMAIN/fullchain.pem $SMF_CERT_DIR/smtp.ec.cert
    cp /etc/letsencrypt/live/$SMF_DOMAIN/privkey.pem $SMF_CERT_DIR/smtp.ec.key
    # Provide ECDSA certs as RSA certs too (jank).
    cp /etc/letsencrypt/live/$SMF_DOMAIN/fullchain.pem $SMF_CERT_DIR/smtp.cert
    cp /etc/letsencrypt/live/$SMF_DOMAIN/privkey.pem $SMF_CERT_DIR/smtp.key
    echo "Done!"

    # Leave SMF's auto-generated and self-signed RSA certificates alone (ECDSA ones get chosen by default nowadays).

    sleep 12h &
    wait $!
done
Script for uploading DKIM Records
What the heck is a DKIM record?
A DKIM record is just a TXT record that goes into the DNS entries for a domain, and includes the public part of a public-private key pair that can be used to show that an email is from an authorized user of a domain. When a mailserver sends an email (say, from john@pantsforbirds.com), it can be “signed” with the DKIM signature which corresponds to the public key stored as a DKIM record as a DNS entry at pantsforbirds.com. A recipient of an email can then verify the DKIM signature of an email which purports to be from pantsforbirds.com with the freely available pantsforbirds.com DKIM public key. If the signature checks out, then the email is presumed to be authentic, and from an actual authorized sender at pantsforbirds.com. Cloudflare has a better explanation of this concept, with more words!
Ok cool, gimme the script.
Here’s a handy script for automatically updating your DKIM records if you use GoDaddy as a domain registrar. This script copies the DKIM records stored in the /data/dkim folder in the mail-forwarder container, and uploads them to the relevant domain via the GoDaddy v1 API. This script only needs to be run when new DKIM keys are generated by SMF.
# !/bin/bash

# John McNelly - john@johnmcnelly.com
# 2024-04-23

# Example of default.txt format below (I think it's a PHP snippet).
# default._domainkey	IN	TXT	( "v=DKIM1; k=rsa; "
# 	  "p=MIIBIjANBgkqhkiG9w0BAQEFAAOCAQ8AMIIBCgKCAQEAxmfyDyqu5tHk+VsL97p/nXRxGEUuCYjMKb5i1AX8Vyr6bw+ALoza9r6Od8XC10aSnVHLhsOzRb6HeN7e44PrHl4noxJxkl9rqdMYpylmFjX+uMz2asghajsgagsagawrgargss+7yhN2M4+7Z0+UsZSEEYKyE70T8ZvU42O17uCPv20uBnRf3YTmD9uOly7gUHOce9"
# 	  "IiPIsadfaREGDsgraLYLnNLpDIg10C75ne4MxO6dDCPR1vCy48ncciqWWsRcn7gBUWXP47STkLr6eDs9yhrPzj7JvREsG7YkycNKifvwOg7PRoNQFzwPew0nU7XmNED36TuwIDAQAB" )  ; ----- DKIM key default for johnmcnelly.com

source $(dirname "$0")/../.env.birdbox
headers="Authorization: sso-key $GODADDY_API_KEY:$GODADDY_API_SECRET"

smf_dkim_dir=$(dirname "$0")/../mail_forwarder/data/dkim

# Check if jq is installed; it's needed to not break things with DKIM keys as JSON values.
if ! command -v jq &> /dev/null; then
    echo "jq not installed, please install it with sudo apt install jq" >&2
    exit 1
fi
# Make sure this script is run as root to avoid issues with accessing DKIM files created by SMF.
if [ "$(id -u)" -ne 0 ]; then
    echo 'This script must be run by root, exiting.' >&2
    exit 1
fi

echo "### Uploading DKIM keys as TXT records."

if [ ! -d "$smf_dkim_dir" ]; then
    echo "Can't find SMF DKIM directory $smf_dkim_dir" >&2
    exit 1
fi
for smf_record_dir in "$smf_dkim_dir"/*; do
    echo $smf_record_dir

    domain=$(echo "$smf_record_dir" | grep -oE '[^/]+$')
    echo "## Reading SMF-generated DKIM record for domain: $domain"

    # Read in the DKIM key .txt file generated by SMF.
    value=""
    while IFS= read -r line; do
        # Assume one token per line, with the interesting part wrapped in double quotes.
        value_token="$( echo $line | grep -oE "(\"[^\"]*\")+" )"
        value_token="${value_token//\"}" # remove quotes
        # echo "Text read from file: $value_token"
        value+=$value_token
    done < $smf_record_dir/default.txt
    echo -e "\tValue:$value"

	echo "## Updating server DKIM record $domain"
    domain_tokens=($(echo $domain | grep -oE "[^\.]*"))
    name=default._domainkey
    last_name_token_index=$(expr ${#domain_tokens[@]} - 2 )
    if (( "${#domain_tokens[@]}" > 2 )); then
        # Iterate through each domain token, ignoring base domain and domain extension.
        for (( i = 0; i < $last_name_token_index; i++ )); do
            name+=".${domain_tokens[$i]}"
        done
        echo -e "\tDetected non top-level domain. Using name: $name"
    fi

    base_domain=${domain_tokens[$last_name_token_index]}.${domain_tokens[$last_name_token_index+1]}

	request_url="https://api.godaddy.com/v1/domains/$base_domain/records/TXT/$name"
	echo -e "\tREQUEST_URL: $request_url"
    result=$(curl -s -X GET -H "$headers" $request_url)
    echo -e "\tGET RESULT:$result"

    request='[{"data": '$(echo $value | jq -R .)',"name": "'$name'","ttl": 3600}]'
    echo -e "\tREQUEST:"
    echo -e "\t$request"
    nresult=$(curl -i -s -X PUT \
        -H 'accept: application/json' \
        -H "Content-Type: application/json" \
        -H "$headers" \
        -d "$request" $request_url)
    echo -e "\tPUT RESULT:"
    echo -e "\t$nresult"
done
A wrinkle: Port 25 is blocked 🙁
I was originally convinced that setting up SMF would take a few hours, maybe an evening or two at most. The vast majority of the reviews and testimonials were from happy customers who were able to get it up and running in very short order. For some reason, I was simply unable to get any messages in, or out, of my SMF container despite a number of hours of effort. Pretty soon, I realized that most of the other users of the SMF image were happily doing so from the cloud, using Virtual Private Servers (VPSs) or other cloud compute instances with unrestricted access to the internet. It seemed like my problems were likely due in part to my webserver being hosted at my house on a residential internet connection.
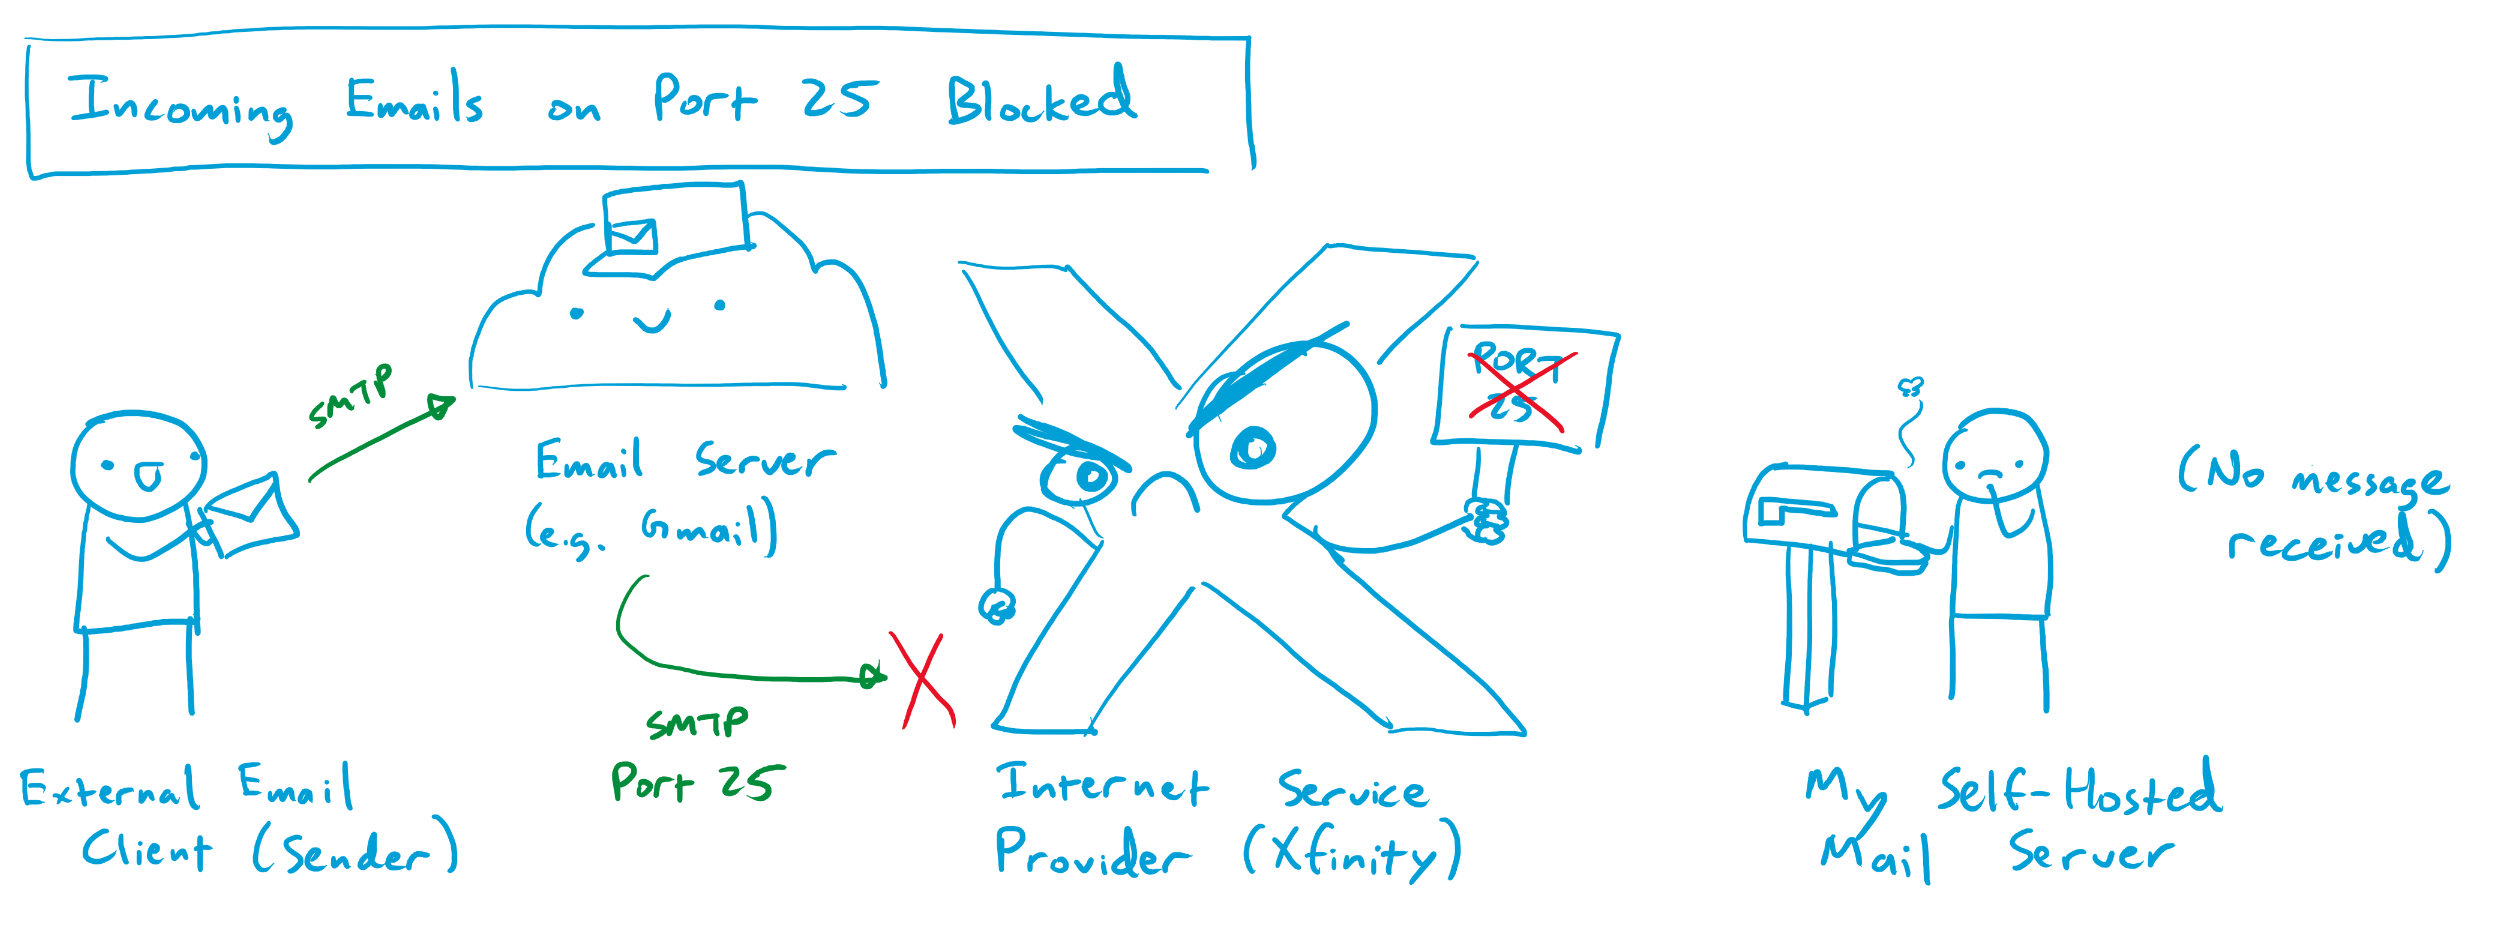
After some digging, I found out that one of the ports I had forwarded from my webserver through my home router had been blocked by my ISP (Comcast). Running my mail forwarder required the use of two ports: port 587 (for SMTP traffic secured with encryption) and port 25 (the classic port used by mail servers to send and accept mail). Apparently, a while back, a few enterprising individuals found out that it was relatively easy to infect home internet users’ devices and have them send out copious amounts of spam email / malware / etc on port 25. Comcast and many other ISPs eventually had enough of this and figured that the best way to protect us from ourselves was to universally ban use of port 25 on any residential internet connection. Beyond the small handful of exceptionally irate superusers who hosted their own mail servers at home, nobody seemed to notice or care. Some of said irate superusers have managed, after great difficulty, to navigate the infinite fractal phone / email tree that is Comcast customer service in order to get port 25 unblocked for their service connection. Many more have failed, and the path to a successful port unblock seems to have gotten increasingly narrow and uncertain over the years. It seems that most Comcast employees have no idea what port 25 even is, and those who do are for the most part insistent that it is impossible to unblock for a given residential service connection. For a while, it seemed like this might be the end of the road.
Unblocking Incoming Port 25 with an Email Store-and-Forward Service
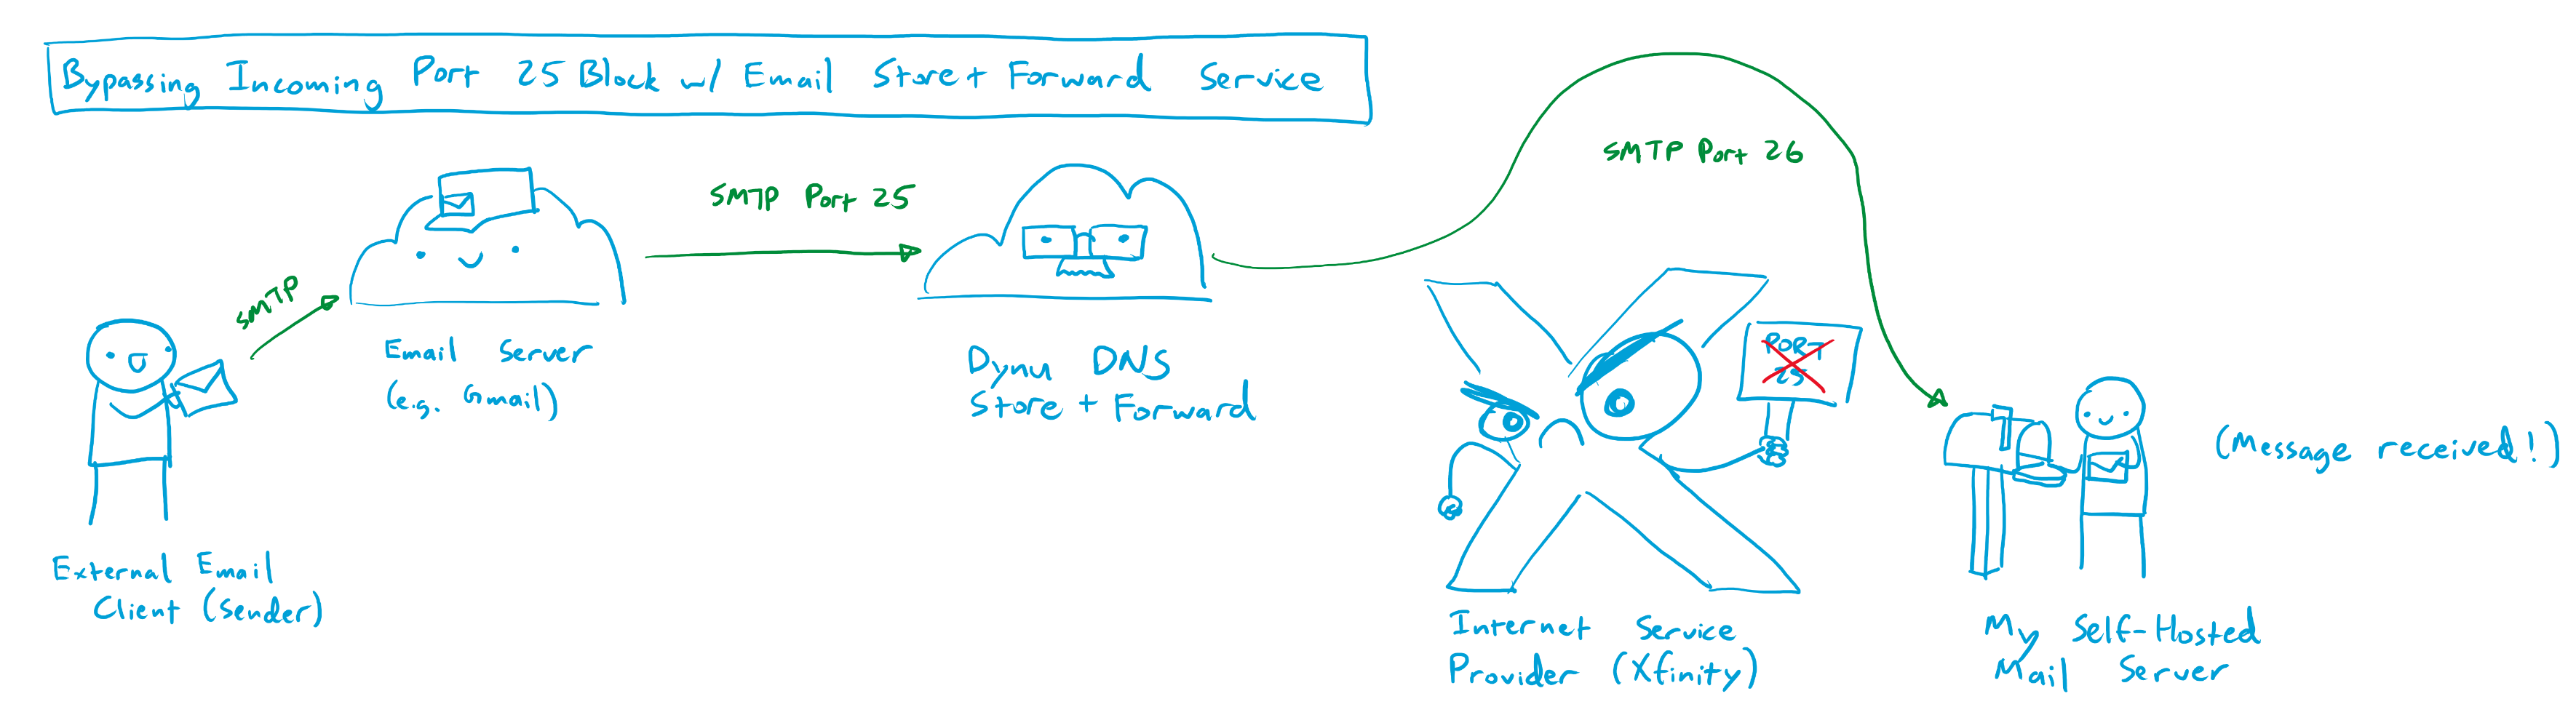
By chance, I stumbled onto one of the aforementioned pissed off superuser threads where someone offered a helpful suggestion for allowing incoming mail to bypass port 25 on a residential internet connection. A company called Dynu DNS, based in Arizona, offers an email store-and-forward service that can operate on a different port from port 25. For a small fee of $10 per year, users can point the MX records from their domain towards Dynu’s mail servers, which accept mail from the internet on port 25, temporarily store the incoming messages, and then forward them to the users’ mail server on an arbitrary port that is not blocked by the users’ ISP, like port 26. This email store and forward service is relatively cheap, at $10 per year, but is locked to only a single domain. For instance, one store and forward service will only forward emails addressed to pantsforbirds.com, and I need to purchase a second service subscription to forward emails addressed to johnmcnelly.com. Still, for an additional cost of <$1 per domain, per month, this isn’t a bad deal, as it enables email reception for an unlimited number of email addresses at that domain!
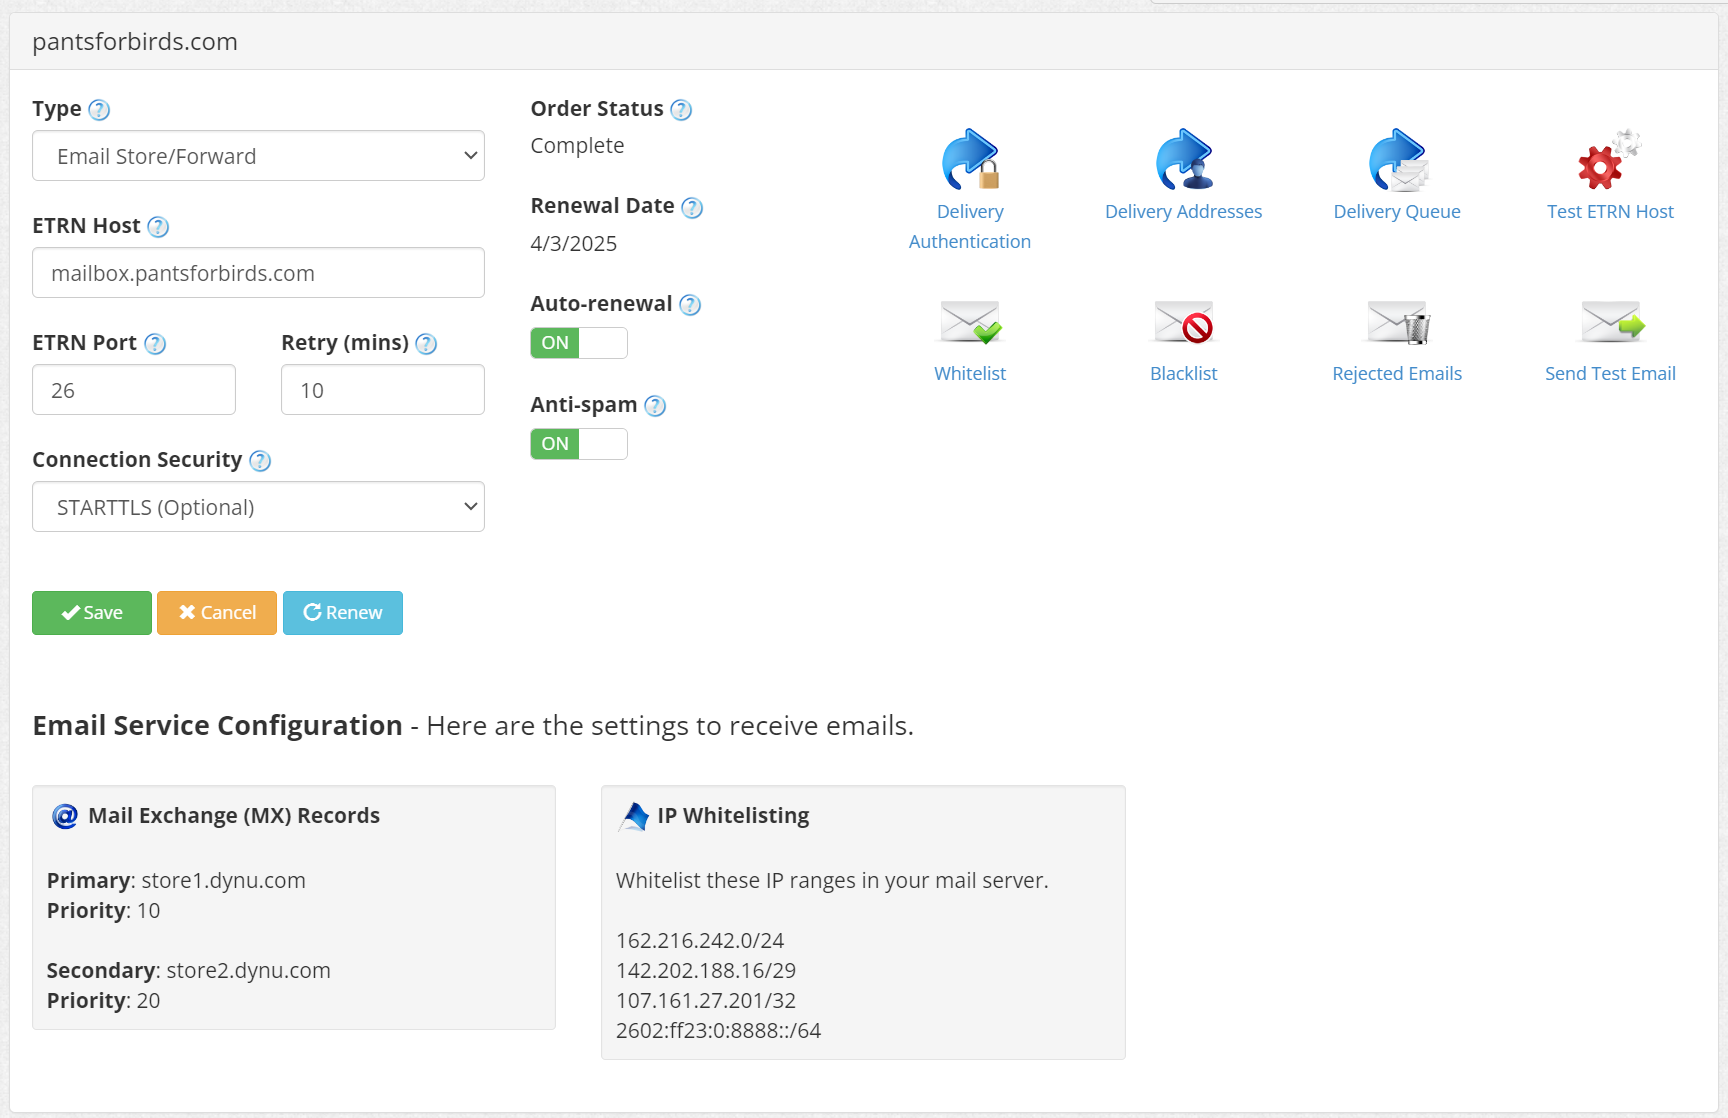
After configuring Dynu DNS’s store and forward service, I was able to send emails to john@pantsforbirds.com and have them forward properly into my gmail account. Unfortunately, I was still unable to send outgoing mail from my gmail account via my SMF docker container. Logs showed that messages were arriving into the SMF container, but then failing to send due to postfix being unable to connect to the destination mailserver.
Sending Outgoing Mail with an SMTP Relay Service
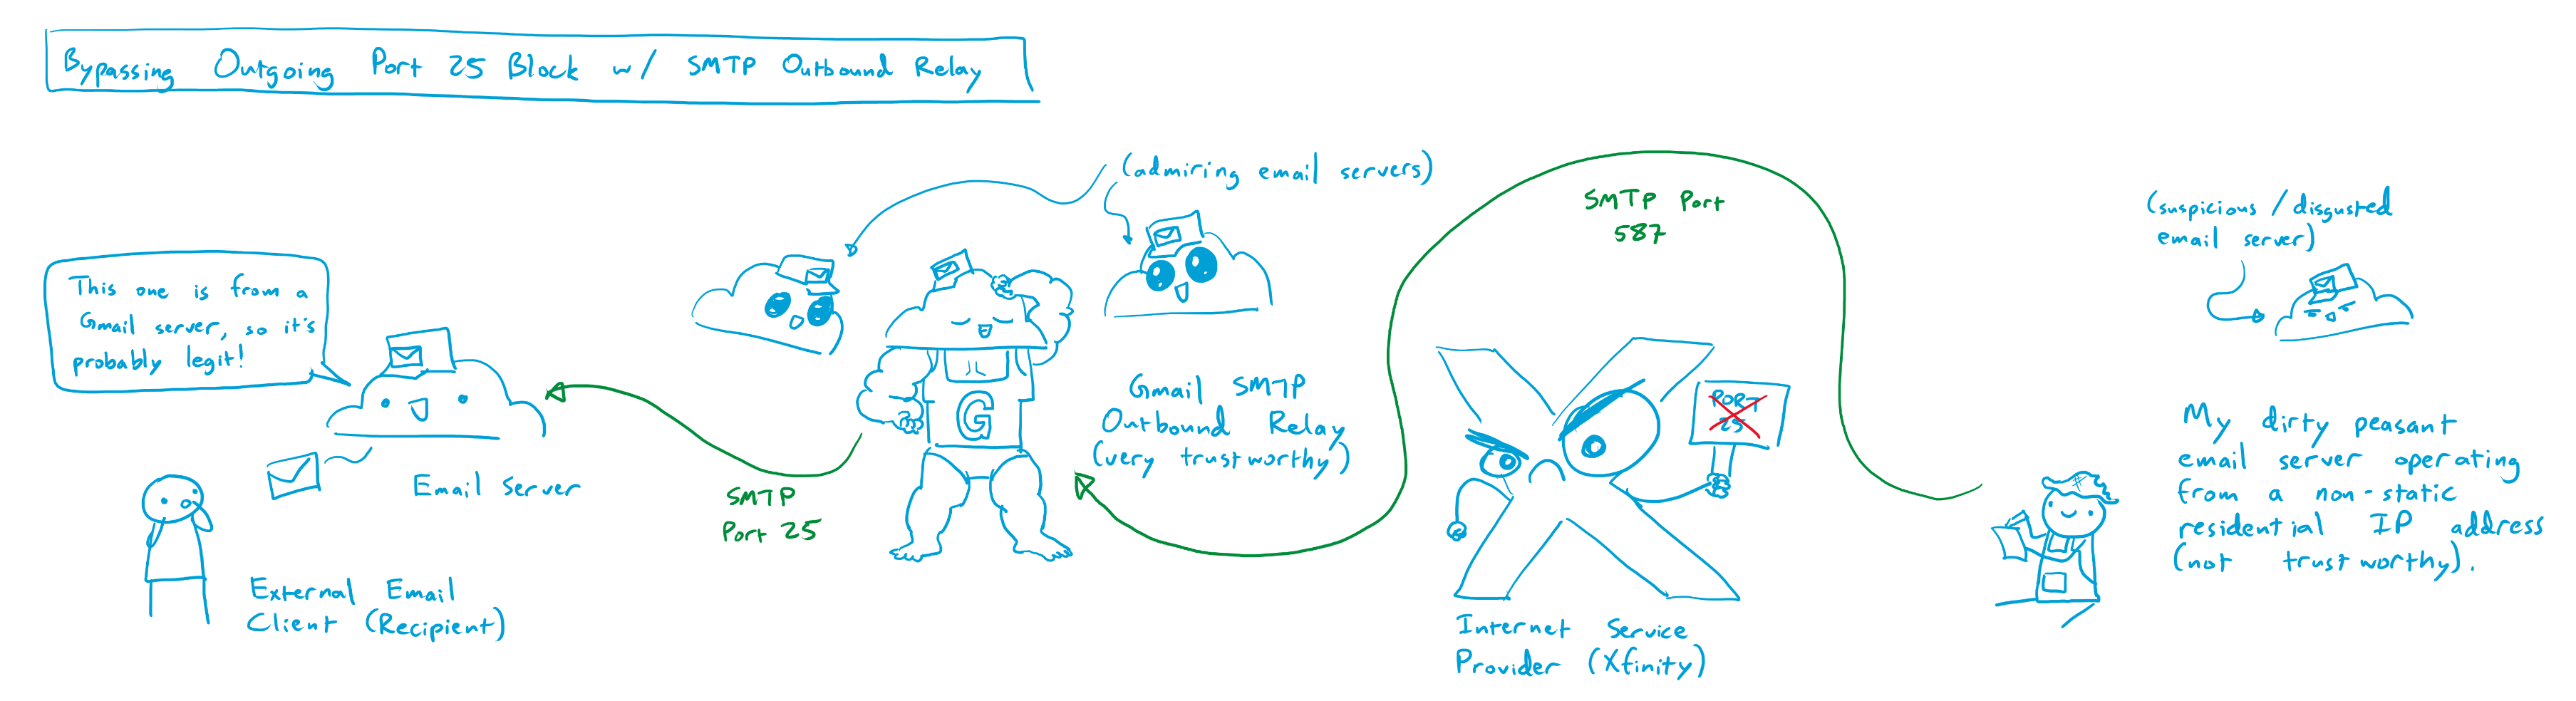
After some digging, it became apparent that postfix was attempting to send outgoing mail to the destination mailserver on port 25, which was obviously blocked on my residential internet connection. There may have been some other clever ways around this, but the most straightforward seemed to be via the use of an SMTP relay service.
Much like the email store and forward service provided by Dynu DNS, and SMTP relay service receives and sends emails, but acts as an outgoing mailserver connector instead of an incoming mailserver connector. My SMF instance would connect to the SMTP relay service on an unblocked port, like port 26 or 587, and send an outgoing message over SMTP with TLS encryption. The SMTP relay service would receive this message, and then emit it to the destination mail server over the internet on the proper port (i.e. port 25). Using an SMTP relay service provides a number of side benefits beyond bypassing the port 25 block on a residential ISP:
- SMTP Relay Services have static IP addresses that are not in residential IP ranges, reducing the likelihood that an outgoing email message gets marked as spam.
- SMTP Relay Services can offer DKIM signing (discussed earlier), but I don’t use this feature since postfix already provides that option. This can be used to verify that an email message is authentic and was sent by an authorized user of a given web domain.
Dynu DNS offers its own SMTP Outbound Relay service, which is also quite affordable at $10/yr, but each service will only forward outbound emails for a single web domain. Dynu DNS is also not considered the most reputable source for email messages, so emails that are relayed through Dynu DNS often get dumped into the spam folder. Not great, especially for customer facing emails that could be important!
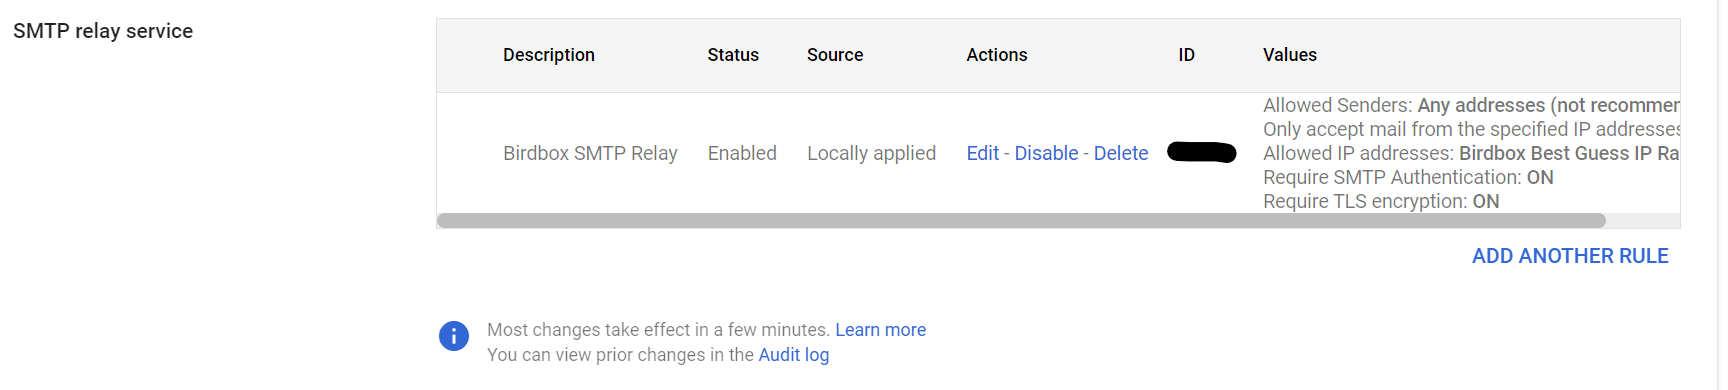
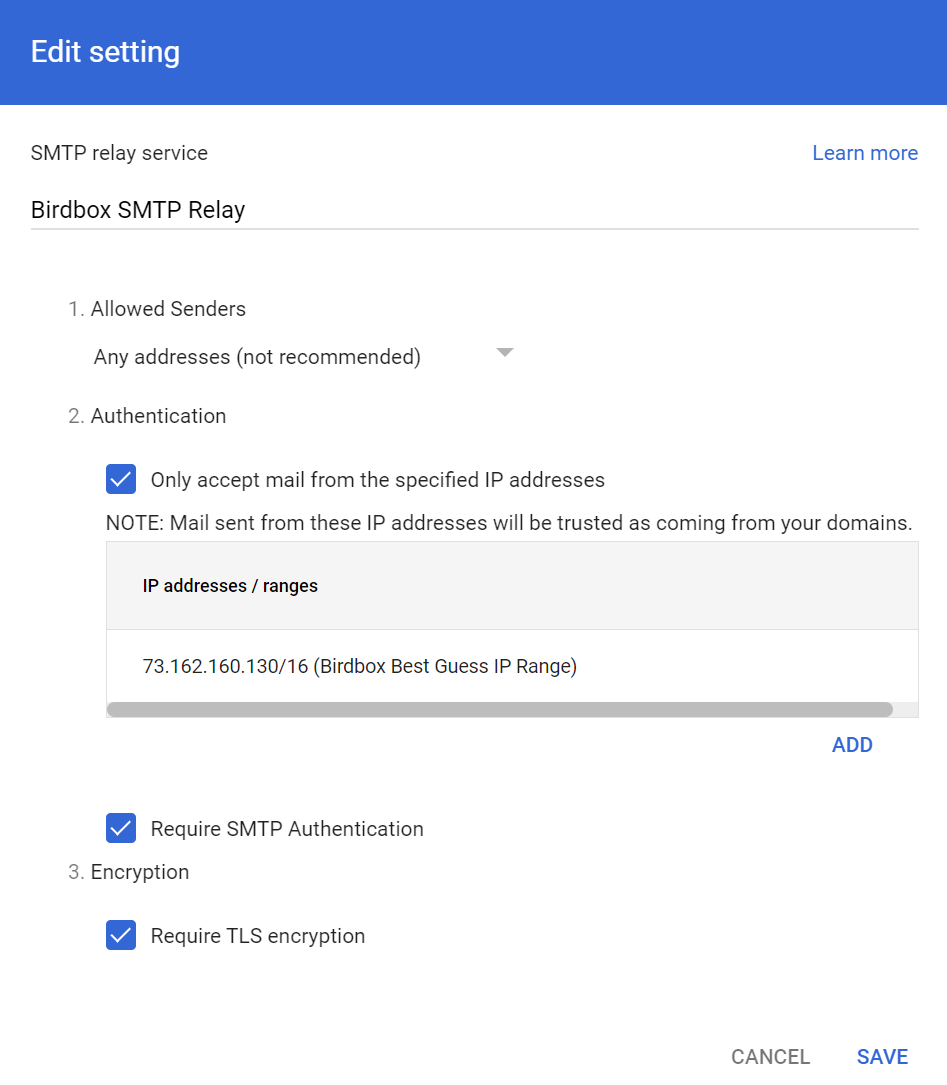
Fortunately, Google offers an SMTP relay service for Google Workspace users, which provides a reputable point of origin for outgoing emails. Google’s SMTP relay service is highly customizable, allowing outgoing email from a number of different addresses, supports encryption with TLS, and supports SMTP authentication with a generated app password (so you don’t have to put your primary Google account password into your mail server’s configuration files, and can revoke access to just the mail server if necessary). A Google Workspace account is quite a bit more expensive than the Dynu DNS Outbound Relay service, with a minimum price of $7/mo, but the ability to relay emails from multiple domains, and the reduced likelihood of having messages sent to spam, made the tradeoff worthwhile for me.
Setting up the Google SMTP outbound relay was relatively straightforward when following the instructions provided by Google. Here’s the settings I use for the SMTP outbound relay in my google workspace:
Funnily enough, the trickiest part of getting the SMTP relay working for me was getting the syntax correct for the SMF_RELAYHOST variable in my configuration file; postfix required some pesky square brackets before a port number that wasn’t mentioned in any of the documentation that I could find. I’ve included an anonymized .env file in the next section to hopefully save other adventurers some trouble!
SMF .env file
# Add email mappings here in the form "website_email_address:forwarded_to_address:password".
# NOTE: All accounts must have passwords or else they will be auto-generated, or set to match password of first account.
SMF_CONFIG="@website:forwardtoemail@email.com:smtppassword1;
username@website:forwardtoemail@email.com:smtppassword2"

# Note: SMF_DOMAIN needs valid siged TLS certificates for TLS to work!
SMF_DOMAIN="mail.website.com"
SMF_CERT_DIR=/etc/postfix/cert # Used in the Certbot container to figure out where to copy web certs to allow them to be used for SMTP.

SMF_RELAYHOST="[smtp-relay.gmail.com]:587"
SMF_RELAYAUTH="relayuser@website.com:<app password>" # Use an App Password for Google SMTP Relay.

# Timezone
TZ="America/Los Angeles"

# Stop emails from getting hard rejected until I'm sure the config is right.
SMF_POSTFIXMAIN_soft_bounce=yes
Tada!
Well, that’s pretty much it! With an email store and forward service to bypass port 25 on the way in, and an SMTP relay service to bypass port 25 on the way out, self-hosting a Mail Transfer Agent on a residential internet connection is quite workable!
I’ve been using my SMF instance for a few months now, and it seems to work without much of an issue (although the Gmail inbox I forward incoming mail to sometimes doesn’t like that it comes in via the Dynu DNS servers, and marks some messages as spam).
Mucking through this email adventure probably took me something like 40 hours total, so it was a little while before I finally got around to requesting those free chip samples using my fancy corporate email address (john@pantsforbirds.com). The company promptly replied that they were unable to ship me free samples, as they don’t ship to PO boxes nor residential addresses. Sometimes the real “free samples” is the amorphous blob of IT knowledge we collect along the way. 🫠